 The corners did not line up correctly..... I tried and tried. I am sending my spare fabric so you can replace if necessary.
Wednesday, July 6, 2011
Rachel S Loerts June Block
The corners did not line up correctly..... I tried and tried. I am sending my spare fabric so you can replace if necessary.

Thursday, June 30, 2011
Video Link
Thank you, thank you, thank you... I couldn't get the link to take on our web site. It is the right one and it is easy. You're the Best! I am a little Technology challenged. :)
Video Link
I was just watching the video for the 3D Faux Cathedral Window Quilt Block. It looks like it will be a lot of fun. In case you haven't seen the video yet, I thought I'd put the link here on the blog.
Just click on the link and you should get to the video:
http://www.youtube.com/watch?v=DvXUvKIzYZY
I can't wait to see everyone's in July!
Just click on the link and you should get to the video:
http://www.youtube.com/watch?v=DvXUvKIzYZY
I can't wait to see everyone's in July!
Wednesday, June 29, 2011
comment
I can't seem to comment but I like the pattern of the month. I did it in one of my classes. It is awesome and super easy.
3DFaux Cathedral Window Instructions.
The size of the blocks are as follows:
3 1/2" squared solid black fabric (Qty. 16)
6 1/2" squared coordinating solid piece of fabric (Qty. 4)
3 1/2" squared accent piece (exotic anmal fabric) (Qty. 4)
It is much easier than it looks or I wouldn't have done it. Just watch the video she is very good at explaining it and demonstrating it. It is sooo cool when it is done. I am excited to see what you come up with. I am going to get a jungle green for the edging of the quilt. Rosanne said she would help me do the scalloped edging. My bedroom is done in the animal prints. I will be fine with whatever animal print you choose. I think Rachel said girraff and I am fine with whatever you choose. Just because you chose it. If you have questions do not hesitate to ask. To get to the video: Google: How to make 3D Faux Cathedral Window Quilt Block I thought it would be fun to learn something new. :)
3 1/2" squared solid black fabric (Qty. 16)
6 1/2" squared coordinating solid piece of fabric (Qty. 4)
3 1/2" squared accent piece (exotic anmal fabric) (Qty. 4)
It is much easier than it looks or I wouldn't have done it. Just watch the video she is very good at explaining it and demonstrating it. It is sooo cool when it is done. I am excited to see what you come up with. I am going to get a jungle green for the edging of the quilt. Rosanne said she would help me do the scalloped edging. My bedroom is done in the animal prints. I will be fine with whatever animal print you choose. I think Rachel said girraff and I am fine with whatever you choose. Just because you chose it. If you have questions do not hesitate to ask. To get to the video: Google: How to make 3D Faux Cathedral Window Quilt Block I thought it would be fun to learn something new. :)
Tuesday, June 28, 2011


Saturday, June 25, 2011

Thursday, June 23, 2011
:(
I spy...
 ...The wrong design.
Whoops! Well, the correct pattern will be in the mail to you by this weekend :)
 ...The wrong design.
Whoops! Well, the correct pattern will be in the mail to you by this weekend :)
Wednesday, June 22, 2011

Tuesday, June 21, 2011
Blues Looking Good!
All of the blues match real well. Beki, looks like you may need some more greens. I know you are excited to put it together. Looks Great!
& Another for June

Rachel L. - I will have yours to you soon too! I have cut 2 sewn 1 and like neither- hoping 3rd time will be the charm...

Wednesday, June 15, 2011

Monday, June 13, 2011


Sunday, June 12, 2011
June's square from Georgia
 Ok I used my cell phone so my focus wasn't any good, but here in my quilt square.
 Tuesday, June 7, 2011
Completed June Beach Double Pinsheel Squares
I have finished two different color schemes for my beach themed quilt in the double pinwheel pattern using the materials I had in the taped prototypes posted earlier. The blue one below was my first full sized block, measuring 12 inches completed using 1/4 inch seams following the pattern I posted earlier at site:
http://www.quilt-lovers-guide.com/double-pinwheel-quilt-block.html
Then I did a green color scheme. See below, it is technically better than this first one. I like both color schemes and can't wait to see what you pick!!! My plan is to use tan/beige "sand" colors for the borders....but I might try a stainedglass approach and use black as a border to make it pop, not sure, we will see which way it goes as your squares/waves come "rolling" in!!!

I was going to try a third one combining the blues and greens, and if I like it I will post it too.
Have fun! For a fun summer project for my granddaughter and daughter I am going to help them do some piecing using all the scraps I have accumulated, maybe begin making some Christmas presents to put back for friends and family!!!! They could make a quilted bag, or lap throw, or wall hanging....things that don't require a full sized quilt effort. Happy Summer!!! We LOVE Summer!!

Thank you in advance!!! I am excited to see what the mail holds for me over the next few weeks!!
http://www.quilt-lovers-guide.com/double-pinwheel-quilt-block.html
Then I did a green color scheme. See below, it is technically better than this first one. I like both color schemes and can't wait to see what you pick!!! My plan is to use tan/beige "sand" colors for the borders....but I might try a stainedglass approach and use black as a border to make it pop, not sure, we will see which way it goes as your squares/waves come "rolling" in!!!

I was going to try a third one combining the blues and greens, and if I like it I will post it too.
Have fun! For a fun summer project for my granddaughter and daughter I am going to help them do some piecing using all the scraps I have accumulated, maybe begin making some Christmas presents to put back for friends and family!!!! They could make a quilted bag, or lap throw, or wall hanging....things that don't require a full sized quilt effort. Happy Summer!!! We LOVE Summer!!

Thank you in advance!!! I am excited to see what the mail holds for me over the next few weeks!!
Saturday, June 4, 2011
Material Girls: I promise
Material Girls: I promise: "Roslyn already has this- I'm not quite that far behind... But thought I'd post my April block By Monday I hope to have both (for this gro..."
Friday, June 3, 2011
I promise
Roslyn already has this- I'm not quite that far behind...
But thought I'd post my April block

By Monday I hope to have both (for this group and my other) my May blocks complete and in the mail!
I PROMISE
Then I can start on June's block, get it finished and in the mail before the month is over!
My quilt class doing 3 D quilt blocks

I don't know if tell but these are 3 d, which only means I have a few squares on top of the fabrics. I just thought you might be interested in this quilt class I am attending.
Thursday, June 2, 2011
JUNE BLOCK
OK, here is the JUNE BLOCK, it is a Double Pinwheel, in blues and greens for beach colors. I am including the link to the on line tutorial and then my personal very basic tutorial is below. Since the online double pinwheel I found is copyrighted and I do not want to infringe by copy/pasting. I want to point out that they use the term medium color for the large dark triangle, I am using dark for the large triangle and medium attached to the light- here is the link the pics are very helpful:
http://www.quilt-lovers-guide.com/double-pinwheel-quilt-block.html
Then below is my step by step. Let me explain what I did; I made a small prototype so to speak using tape so that I could pull it apart and rearrange to experiment with the color variations. I bought 3 shades of green and 3 shades of blue both with a dark, medium and light shade. I got enough to do blocks in using both, but since you are only producing one block, you can choose all blue shades, all green shades or a combo of both as my "finished" blocks will show. I will demonstrate the cutting patterns and give measurements, and then show the finished products. Keep in mind these are miniature blocks shown on here. I wanted to go ahead and post so you can begin if you wish. I will show my completed block(s) in the next day or two. Have fun with the combos you choose and the visual effects that are produced by where you place the darks and lights.
The picture below... I was trying to show you use two large blocks in dark measuring 7 & 1/8 inch square and then two smaller blocks in two different colors-one a medium and one a light color (my light is a yellow green) these measure 6 & 7/8 inch square. For a total of three colors but four blocks.

Next, on the 2 large dark squares (one color) cut diagonally from corner to corner, you will have four large dark triangles when it is completed. Cut double cross cut on the 2 smaller (two different colors) squares so you will have four small triangles of a light color and four small triangles of a medium color, though I only show the light color of the smaller ones in the shot below.

In the online tutorial it shows how you put them together: stitch one light color and one medium color small triangle together after placing them together in a way that 90 degree angles form the midline of the new triangle the form see the picture on the website. Do this x 4. Then sew that portion to the large dark color triangle on the long sides so that when it is completed the large dark triangle when facing you is on the bottom right and the block it forms and the multi-colored double triangle is on the upper left of the block with the medium portion showing as the inner triangle (see web site).
The examples I show below are two completed small prototypes that I taped together so I could pull them apart and switch the colors. The following pictures are of the all blue on left and all green on right. Keep in mind I did not use exactness and they are smaller than the actual blocks will be.

The last shots are showing how I switched out the light green to the blue square and the light blue to the green square, for my own curiosity and to help you in making your decisions as well.
There are numerous possibilities which is one of the fun things about quilting.

I wanted to get these on quick but wanted time to play with color variations before I posted my finished block(s). I will post the real ones in the next few days.
I hope this is an adequate explanation and guide and that you have fun doing this pattern. As I researched, if you are not familiar with quilting as I am not, I was simply amazed at the huge number of variations on the pinwheel pattern. I picked a very basic simple one but still catchy to the eye. If you have any questions my email is beki@bekigraham.com. which you may since I am doing this at such a late hour and my brain I think has already gone to bed. Thank you! and Thanks to my dear husband who took the pics and got them into this blog site for me!
http://www.quilt-lovers-guide.com/double-pinwheel-quilt-block.html
Then below is my step by step. Let me explain what I did; I made a small prototype so to speak using tape so that I could pull it apart and rearrange to experiment with the color variations. I bought 3 shades of green and 3 shades of blue both with a dark, medium and light shade. I got enough to do blocks in using both, but since you are only producing one block, you can choose all blue shades, all green shades or a combo of both as my "finished" blocks will show. I will demonstrate the cutting patterns and give measurements, and then show the finished products. Keep in mind these are miniature blocks shown on here. I wanted to go ahead and post so you can begin if you wish. I will show my completed block(s) in the next day or two. Have fun with the combos you choose and the visual effects that are produced by where you place the darks and lights.
The picture below... I was trying to show you use two large blocks in dark measuring 7 & 1/8 inch square and then two smaller blocks in two different colors-one a medium and one a light color (my light is a yellow green) these measure 6 & 7/8 inch square. For a total of three colors but four blocks.

Next, on the 2 large dark squares (one color) cut diagonally from corner to corner, you will have four large dark triangles when it is completed. Cut double cross cut on the 2 smaller (two different colors) squares so you will have four small triangles of a light color and four small triangles of a medium color, though I only show the light color of the smaller ones in the shot below.

In the online tutorial it shows how you put them together: stitch one light color and one medium color small triangle together after placing them together in a way that 90 degree angles form the midline of the new triangle the form see the picture on the website. Do this x 4. Then sew that portion to the large dark color triangle on the long sides so that when it is completed the large dark triangle when facing you is on the bottom right and the block it forms and the multi-colored double triangle is on the upper left of the block with the medium portion showing as the inner triangle (see web site).
The examples I show below are two completed small prototypes that I taped together so I could pull them apart and switch the colors. The following pictures are of the all blue on left and all green on right. Keep in mind I did not use exactness and they are smaller than the actual blocks will be.

The last shots are showing how I switched out the light green to the blue square and the light blue to the green square, for my own curiosity and to help you in making your decisions as well.
There are numerous possibilities which is one of the fun things about quilting.

I wanted to get these on quick but wanted time to play with color variations before I posted my finished block(s). I will post the real ones in the next few days.
I hope this is an adequate explanation and guide and that you have fun doing this pattern. As I researched, if you are not familiar with quilting as I am not, I was simply amazed at the huge number of variations on the pinwheel pattern. I picked a very basic simple one but still catchy to the eye. If you have any questions my email is beki@bekigraham.com. which you may since I am doing this at such a late hour and my brain I think has already gone to bed. Thank you! and Thanks to my dear husband who took the pics and got them into this blog site for me!
Tuesday, May 31, 2011

Coming your way Rachel L.
Here's my block for May!
 Beki, thanks for the techniques tips and looking at the layout. It helped mine go much smoother.
Just a couple of seams needed to be ripped out, but not too frustrating.
Rachel L., good luck putting it all together. It'll be so cool to see it finished.
Sunday, May 29, 2011
Material Girls: May's Block Completed
Material Girls: May's Block Completed
This block looks great! I know it was hard but a great challenge.
This block looks great! I know it was hard but a great challenge.
Saturday, May 28, 2011

Material Girls: Techniques
Material Girls: Techniques: "I was just curious, who did their flower blocks by hand? and who did them by machine? I did mine half and half. My mother (who helped me w..."
Thursday, May 26, 2011
Hi y'all! I am still recovering/catching up from the incredibly busy the months of April and May were! Our first "free" weekend was last weekend in 2 months! I hope to get May's block off at least by the very last day of the month. And I have June....if I remember correctly?
I will find a tutorial to post, but right now I am thinking beach.....beach colors like different shades of blues and greens and possibly a pinwheel pattern....not definite on that, but that is what I am leaning towards. While we are out of town this Memorial Weekend, I will make a sure decision and get it posted.
If I am mistaken and someone else has this month, please pardon....and go right ahead!!!
Thanks for the fun!!!!
Beki Graham
I will find a tutorial to post, but right now I am thinking beach.....beach colors like different shades of blues and greens and possibly a pinwheel pattern....not definite on that, but that is what I am leaning towards. While we are out of town this Memorial Weekend, I will make a sure decision and get it posted.
If I am mistaken and someone else has this month, please pardon....and go right ahead!!!
Thanks for the fun!!!!
Beki Graham
Tuesday, May 24, 2011
Rochelle's Square

K- I totally apologize but here's my square and I've tried and tried and tried - but I can't sew it together. I'm definitely not advanced enough to do this square...way out of my league. If you don't mind - I'll just send the pattern to you - so you can complete it so I don't mess it up worse than I've already did!
Monday, May 23, 2011
Techniques
I was just curious, who did their flower blocks by hand? and who did them by machine? I did mine half and half. My mother (who helped me with the tutorial, but is not part of our group) did hers all by hand. I felt very satisfied knowing I can sew by hand. - Rachel S Loerts
Sunday, May 22, 2011
Mrs. Marion's Hexagon
 My mom texted me this picture of her finished square. I loved the fabrics she chose!
Monday, May 16, 2011
Whew...All finished
 So it was smooth sailing till the last two seams where it kept puckering! I ripped it out 3 times and finally gave up...the pucker won.
Sunday, May 15, 2011

Friday, May 13, 2011
Flower Quilt - Just Cut Out

Rachel Grebe Graham told me to go ahead and post it even though it is just cut out. It was kind of hard but I like a "Challenge". I do think your quilt will look great. Georgia yours looks really good. :) If I can do this....anyone can.
Georgia's attempt at a hexagon

Tuesday, May 10, 2011
"Heads Up For July's Block"
As you are searching for fabric....pull out fabric with exotic animal prints for the month of JULY. For example: zebra, cheetah, giraff, elephant...the list can go on and on. Stay tuned for an exciting month. If you do not have any in your fabric box there are lots out there to choose from.
Saturday, May 7, 2011
HEXAGON FLOWERS
I finally got it posted! Hope you all have as much fun as I did. Warning: this is challenging, but I was ready to try something different. Hope you like it.... Rachel S Loerts


Monday, May 2, 2011
April showers bring May flowers
So I failed to post for May because I did not realize I had taken May. There were two months left on the schedule (May and November) that I had to choose from. If there is no objection, I will take this lovely rainy month of May and leave November
as a free month so we can all have more time to plan for the holidays! I still have to make a tutorial but here is a little teaser:

a FLOWER made of 19 hexagons
assembled and patterned similar to:

A little different shape, but still cutting and sewing. Start collecting scraps and vintage fabrics! More to come on my selection this week. Thanks for your patience. - Rachel SmithLoerts
Saturday, April 30, 2011

Thursday, April 28, 2011
It is Almost time for "May" Quilt Block
Who has May? I am excited for the next block. I sure hope Roslyn has all of her blocks. :)
Wednesday, April 27, 2011
Miss February and Miss March
While at the Post Office today mailing a package to my sister I had the quilt square with me and had the guy weigh it just to see if I had been using the correct postage. Well I had not, I was something like 50 cents off. So I hope that the past two months received their squares because they were never returned, and if you had to pay for the extra postage on your end, I'm sorry, I didn't mean to be that tacky :-)

*Robyn

*Robyn
Friday, April 22, 2011
Blue & Green
I took my husband with me to Joann's for this block to help me pick out "boy-ish" fabric. It's when you don't want a floral fabric that you realize that most everything has some sort of flower on it!
 I took this one with my phone at night so the colors look a little weird.
I took this one with my phone at night so the colors look a little weird.Thursday, April 21, 2011
The best I can do


Monday, April 18, 2011
The First Block
Well, here goes. Being the first block up I hope it is what you expected. The green is a true green. The lighting changed the color of the blocks in some of the pictures I took. I had fun doing this block as always. Hope your son loves his quilt. :)
Sunday, April 17, 2011

Wednesday, April 6, 2011
A Little Hint
Just a hint for those of you who haven't started the latest block...(but of course I have because I'm a little bit of a dork).
When I saw the triangle pattern again, I thought back to Rose's block in February, and her method of making the split color squares by drawing the center line and sewing on either side before cutting in half. It sure works for this design as well.
Just thought I'd share, because at least for me, the less I have to line up together, the less mistakes I'm capable of making! (and less use for the trusty seam ripper...haha).
When I saw the triangle pattern again, I thought back to Rose's block in February, and her method of making the split color squares by drawing the center line and sewing on either side before cutting in half. It sure works for this design as well.
Just thought I'd share, because at least for me, the less I have to line up together, the less mistakes I'm capable of making! (and less use for the trusty seam ripper...haha).

Tuesday, April 5, 2011
The Eccentric Star - Finally!
Again, I apologize for being so flighty with getting my quilt block explained to you!
Quilting is VERY new to me, but I think I finally have this block down.
* Cut 4, 4-7/8" pieces each of blue and green material.
NOTE: I am not good at the "scant 1/4 inch seam", so I cut mine 5" and you can trim down later if you need to.
*Cut 1, 4-1/2" piece of either the blue or the green
* Cut 4, 4-7/8" pieces each of blue and green material.
NOTE: I am not good at the "scant 1/4 inch seam", so I cut mine 5" and you can trim down later if you need to.
*Cut 1, 4-1/2" piece of either the blue or the green
 * Cut each 4-7/8" square on the diagonal
 You will now have 8 triangles of each color and your 4-1/2" square of your color.
 *Place a triangle of each color right sides together and sew a scant 1/4" seam.
*Press seams. My colors were dark, so I pressed them open.
At this point you can trim the squares to 4-1/2 inches, if needed.
You will now have 8 squares.
 *Arrange the squares as shown (I picked one color to be the white in the pattern. It made it easier to follow how to arrange the pieces), with the solid color square in the middle.
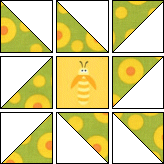 *Sew pieces together in rows - with scant 1/4" seam.
*Sew rows together - with scant 1/4" seam.
 And there you go!
You'll end up with a 12.5" square (giving me my "scant" seam allowance). If it ends up a bit larger, don't worry - you'll give me something to work with!
I think I have to get over my "scant" issue or look for that quilting pressure foot.
 I was surprised at how easy it was to do and it only took me about 1/2 hour.
If any of you have already done it and did it with the smaller size - PLEASE don't worry about redoing it. I know how frustrating that can be. I'll boarder it and use it!
Subscribe to:
Posts (Atom)