Sunday, October 16, 2011

Aunt Georgia!

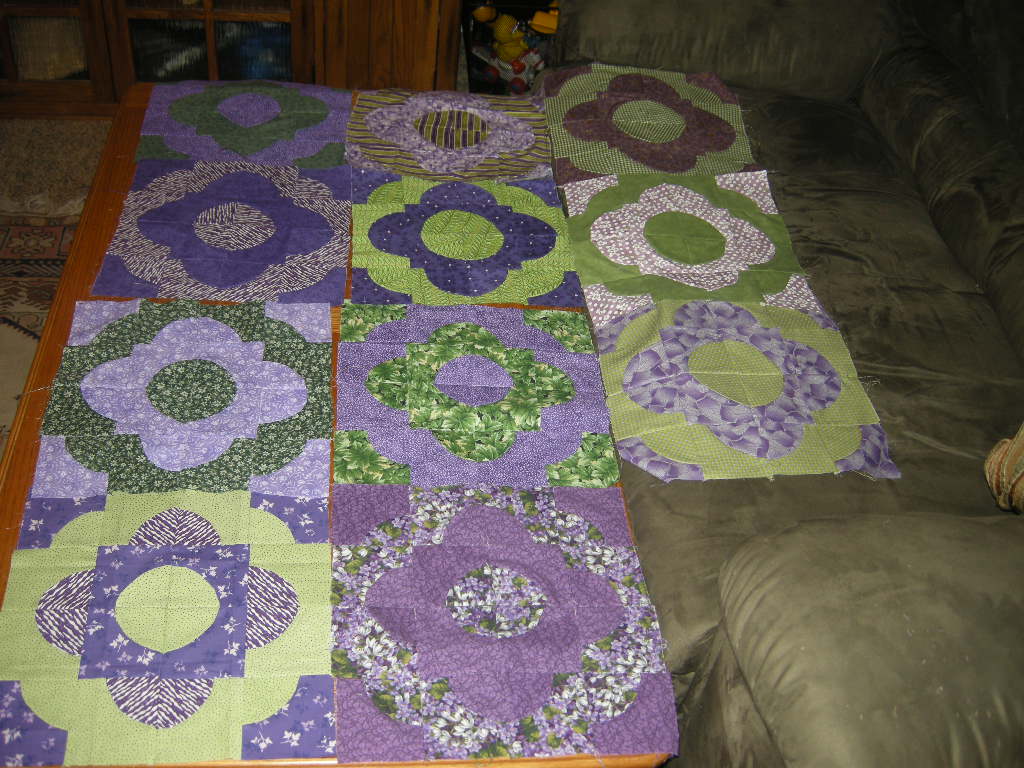
I know I am a complete SLACKER!!! (Doesn't it feel like it should still be August?) I am trying though, here is my August block for Georgia. I had finished it a few weeks ago but then re-did part of it b/c it didn't seem to line up right and so here is my finished product (and it still isn't lined up right) but I hope it works! I really liked this block, really cute!! I can't wait to see the finished quilt. I apologize for being so late!!
Anyway, September and October blocks are on the top of my "to do" list this week!

Everyone

Everyone: My deepest apologies for being MIA the last 4 blocks. I have my house back together now and the next few weeks is quilting make-up! I'll post them as I finish.

Thanks...
Rachel Smith Loerts

Saturday, October 15, 2011

ready to sew my quilt

I am waiting for the last square so I can finally sew my quilt.........................Hello   Rose,  I can just sew another one just let me know.
Georgia

Friday, October 7, 2011

abigail's bowtie

robyn- here, finally, is your september block. i think this is going to be the cutest baby blanket! congrats.

Wednesday, October 5, 2011

instructions for betty's star


My TURN!! October Block

Sorry for the delay - it's Rochelle so you knew this was going to happen.  Anyway I'm absolutely in love with this block.  And can't wait to see how they all turn out.   (Thanks Mom for helping!!)  

The color scheme is fall colors -  If you cannot see them with this picture they are brown, rust, tan, peach orange, green.  My mom...and me...but mostly my mom did 4 blocks so here's some samples of the colors.  Gorgeous right?? (sorry the pink and green behind don't really help do it justice.)


Hope this is a better view of some fabrics.

Use the templates on the instruction sheets to cut out the colors.

So if this Template doesn't work...let me know.  Maybe I'll do a mass email out to get the template to everyone.  Unless someone knows how to get a PDF file on the blog. 


It is easier to start with the dark color and the points.  Which is Fabric A(  the dark or light depending on which one you want the 4 corner points to be) Using the template A cutting four and  One piece of  4 ½ inch squared.  This is the center.


Cut four of Template A
On fabric C which is the background of the star Cut 4 of Template B and four 5 inch square pieces.
Iron Template A in half and the 5 inch square pieces in half.  Once you have ironed them.  Place Template A in the crease of the 5 inc square of Fabric C

Fold Fabric C  in half and sew a scant ¼ inch.  Then fold open and you have the point.

Be sure the fabric was caught in the seam.  Iron them down and you see your points.  See the instruction if you did not understand where I sewed the seam to attach the point.  It really is easy.
Now cut Fabric B
4 – 2 ½ inch squared and
4 of template C
4 of template D       These should be cut out specifically.  Individually so the right side of the fabric and angles will fit correctly on Template B

Now for the center.
Take the Fabric A 4 ½ in square  and iron with wrong sides together.  You will be looking at a rectangle with the right side of the fabric staring at you.

Now place the 2 ½ inch pieces on top of Fabric A.  Put raw sides together and sew on the edges.  This is similar to the square the Dalana had on her Quilt square, just a smaller version.

Once they are sewn open the centers and match the seams


Match center and raw edges

Pin and sew.  Once it is sewn Open it up and you have the center of the star

Press Open. Pressing just helps it all go together easier.

If you place your pieces that you have finished you will have this done.  Lay it out and take a look and it will help with the last stage.
Take Template B, Template C and D

You can see why the Template C and D is cut separately.  If you cut them together you will have pieces that do not fit properly and you square will be scatttywoompus.  So once you place the templates you will see how once you sew the seam you have a square.

Do the right side first and sew from the tip of B to where the straight line ends and the template ends. Iron the seam open and you can see the square taking shape.  Place the next template on the top of your template C and again sew it to where it ends.


Iron it open and you will see your squares.  If it isn’t square you placed the templates incorrectly or cut them out wrong.  Notice I have done that.  That is why I know.  Look at the tip where the point comes together.  It is important to have the templates overlapping and have room to match with the tip of the center square.  So take a look and if there isn’t enough  Then take the seam out reattach the template so that it overlaps.  Once you see it you’ll know exactly what I am talking about.  Sorry I can't describe it right!
I laid out the pieces so I could see the finished product.  I did each row separate.  I started with the center.  I lined up the point of the center square and the point of Template B and then sewed the edges.  The points should be staring at each other.  I did the other end the same way.  Now off the the end pieces.  They are pretty easy.  Just be sure the raw edges of the Template A points and sewn in the seam.  Sew all together.  Now you should have 3 rows to but together.
Attach the center row to the side, Match up the center points to the seam and the center point to Template B They should all go together pretty easy.  Again be sure you’re points are in line and the raw edges of the corners are including in the seam so the fabric doesn’t pull out.


Square off to 12 ½ inche3s and Voila you did it.  Yeah.  If you have any questions please ask my mom...cause I won't know the answers.  I'm sewing retarded!

Thanks guys and have fun!!!!    

Sunday, October 2, 2011

Am I the last one for September?

With the way my September went I finally got my bow tie block done Oct. 1st.
It will be in the mail on Monday. Sorry for the lateness.
It was so fun and easy, I don't know why I didn't get it done sooner.

Saturday, October 1, 2011

Exotic Cathedral Window - Great Job Everyone. I love it!!!!!

BOW TIES

Robyn, I was worried about the black in mjy print. Howeve, I really liked the print. When I did my block, it seemed like it was very hard to find yellow and gray. Then when I finished my block of course, yellow and gray was all over the place. I hope it works. If not, I can do another one. It looks better in real life. :)

Friday, September 30, 2011

Bowties

I've gotten a few of the blocks so far and they are so cute! Every time I lay them all out on the bed to see what the finished product will look like. And Dalana, I have to say, I was a little skeptical about the yellow and black fabric, but the pictures don't do them justice. I love the fabrics you chose!
Thanks everyone, this quilt is going to look great in the NURSERY! (Baby A. arriving March 26th-ish!)

Friday, September 16, 2011

My Drunkard path quilt squares.


I have received almost all of the squares and wanted you to see how awesome ya'll did.  Thanks so much.

Friday, September 9, 2011

FYI

I went ahead and sent my address in a facebook message. All of the blocks are looking so cute!

Rochelle's block

Here is the other finished block.  I am sending them today.  I have only received 5 blocks.  Wasn't sure how this was working but I had your address from when you sent your block.
Thanks and enjoy!

Friday, September 2, 2011

September...The Mini Bow-Tie

I decided to pick the "mini bow-tie" because it kind of reminded me of a linoleum floor pattern, weird I know, but it somehow reminds me of home. The colors I'd like everyone to use are Yellow (like primary color yellow) and Gray.

(I really like bold prints, so have fun with the fabrics!)

What you'll need:

1 Gray fabric
2 Different Yellow fabrics

Stuff to Cut:
Cut the Gray fabric into eight 3 & 1/2 inch squares
Cut Yellow (1) into four 3 & 1/2 inch squares and four 2 inch squares
Cut Yellow (2) the same as Yellow (1)... four 3 & 1/2 inch squares and four 2 inch squares
Now time to sew!
First, take the 2" squares and draw a line corner to corner right down the center. You'll sew on this line.
Next place the little 2" squares lined up in the corner of each gray square,right-sides together, pin and sew on the line you marked.
Last cut off the outside edge of the 2" square that you sewed to the gray block. I lined the seam up on the first line on my ruler thing which was about 1/4" and cut it off. Open the square and press the seams toward the gray side.
Once all the little squares are sewn the the corners of the gray squares your ready to put it all together. I would like the yellow "bow ties" paired up in opposite corners.
I found it was easiest to sew the squares together in pairs, then 4 blocks then all together (see pics)
And, the finished product!
You might notice that the colors change, I made a couple blocks so that I could make the quilt a row bigger since I wont use any sashing between the blocks. Anyways, the second block came together easier than the first by using this method.

I'll be looking forward to seeing the finished blocks!

Thursday, September 1, 2011

silly internet...

So I promise I am not being a slacker. I got home to find that the internet and cable were out. apparently there were outages all over colorado...pretty sucky. anyways, internet permitting, the tutorial will be up tomorrow. it'll be much easier than trying to blog from my phone.

Georgia's Quilt

I loved your quilt block. I thought it was so easy. I thought it looked hard but once I got going I thought...Wow this is so cool. When you get all of your blocks and put it together you had better post it. I thought it was great and the colors ought to look good together. (I can'tcomment for some reason so I have to do a new post). I think we have an awesome group...it is great!

Wednesday, August 31, 2011

Procrastinator

I'm glad to see I'm not the only one who finished at the last minute! Hope you don't mind the two different purples, I ran out of the stripe after cutting the circles...whoops. I'm excited to have the next month off and receive my own little yellow and gray goodies in the mail :-)

Tutorial will be up tomorrow!